

I needed a battery for my camping trips and portable ham radio activities, so I decided to tackle that problem once and for all. LiFePO₄ batteries have been on my radar for a few years, but their price has always held me back. At one point, I even bought a “brand-new” battery — but that story didn’t end well. It turned out to be a Trojan Horse in a battery casing.
There’s a full article about that experience, and if you haven’t read it yet, you can check it out here. I wrote this article to share some general insights about LiFePO₄ batteries and their technology, and to provide a detailed, step-by-step guide — complete with a parts list and build instructions — on how to make a high-quality, high-performance 4S 130Ah LiFePO₄ battery pack.
Why would one choose a LiFePO4 Battery?
🔋 1. Safety
LiFePO₄ chemistry is thermally and chemically stable — it doesn’t easily overheat or catch fire.
Much lower risk of thermal runaway than Li-ion (NMC/NCA) batteries.
It can handle overcharge, short-circuit, and puncture conditions better than other lithium types.
🧯 → Ideal for RVs, solar systems, marine setups, and home energy storage — where safety is crucial.
🧠 2. Long lifespan
Typically, a few thousand charge cycles, sometimes more (vs. 500–1000 for Li-ion, ~300 for lead-acid).
It can last 10+ years with proper care.
Very low self-discharge rate (~2–3% per month).
⚡ 3. Consistent voltage
Delivers a stable voltage during discharge (around 3.2 V per cell), which means steady performance for electronics and inverters.
🌡️ 4. Wide temperature tolerance
Performs reliably in both high and low temperatures compared to other lithium chemistries.
Many models work from –20 °C to +60 °C (though charging below 0 °C requires caution).
🌱 5. Environmentally friendlier
Made from non-toxic and abundant materials (iron, phosphate, carbon).
No cobalt or nickel — so it’s safer for production and recycling.
⚙️ 6. High discharge current
Can deliver high instantaneous power, ideal for motors, inverters, or other high-draw devices(Ham radios? 🙂).
💰 7. Lower total cost of ownership
Although more expensive upfront, their long lifespan and low maintenance make them cheaper over time than lead-acid or Li-ion alternatives.
🚐 Typical applications
Off-grid solar storage
Camper vans / RV systems
Marine power
UPS/backup power
Electric scooters, e-bikes, and small EVs
- Power supply for portable HAM / Amateur Radio activities
Conclusion regarding a choice:
And that’s exactly why I needed one — a battery with a good balance of weight, size, and energy capacity, and safe enough to keep it with me inside a home, tent, or the van. I also wanted to avoid the toxic fumes that come with traditional lead-acid batteries. Let`s move to my use cases for this:
Use Case 1 – Portable Ham radio:
It is nice to have enough energy for field day operations. I need something that can handle quite big discharge currents since my Yaesu FT-991A radio can draw around 20 amps when working with full power.
Use Case 2 – Camping:
While camping, I have a 45L inverter 12V fridge that always goes with me, and it would be nice to have enough energy (without recharging) for a weekend to have food and drinks cold, and have light and chargers up and running. I calculated that I would need around 100 Ah of usable capacity.
Use Case 3 – Backup power:
I live in a country so advanced that power outages are practically part of everyday life. The grid can go down for just about any reason — strong wind, heavy snow, too much or too little rain, or simply a human error.
Back in the 90s, we had a rather interesting little war, during which we spent nearly five years without electricity at all. So yes, some lessons were learned the hard way.
That’s why having backup power always feels like common sense to me. Even if a LiFePO₄ battery sits quietly at home doing nothing most of the time, it still earns its place by being ready when everything else fails. Especially since I’ve got a solid 1500 W pure sine wave inverter to pair with the battery. ⚡
BOM for the project:
| Part: | Qty: | Price €: | Link: |
| Heavy-Duty 12V 4S 100AH BMS Lithium Battery Box Enclosure Case | 1 | 23 | https://temu.to/k/e9t69a1cxqz |
| SC ring Copper Terminals | 10 | 2 | https://temu.to/k/ezfotm4ajpf |
| High-Temperature Heat Resistant Tape 30mm*35meters | 1 | 2.5 | https://temu.to/k/eagbqsfx6b9 |
| 3240 Insulation Board Epoxy Plate 300x200x0.5mm | 5 | 4 | https://temu.to/k/ead2pvlkase |
| 3241 Insulation Board Epoxy Plate 172x203x0.5mm | 7 | 6 | https://temu.to/k/e2u14icdqia |
| Daly 100A BMS J24K3(you need 100 4S 3.2V version for LiFePO4 bat.) | 1 | 20 | https://temu.to/k/ezt5lwveg6e |
| Lishen LP44147272 – 130Ah – LiFePO4 3.2V | 4 | 130 | https://tinyurl.com/5dtxz7es |
| Automatic fuse (for household or something similar up to 100 A) | 1 | ||
| 1 meter of thick wire, something like 6AWG or 16 square mm | 1 | ||
| Heatsink for BMS | 1 | ||
| Piece of ABS plastic or Pertinax, 1-1.5 mm thick, 147.5×275 | 1 | ||
| Some heattshrink tube around 16 mm diameter ideally Red and Black | 1 | ||
| 8×8 mm Allen screw | 4 | ||
| Some double-sided sticky tape (3M) | 1 | ||
| Total: 187.5 € |
To put everything together, you would obviously need some skills and tools, including a multimeter and a decent soldering iron.
A few words about the manufacturer of the cells that I chose.
First of all, it’s fair to say that there are cells on the market that look better on paper.
But let’s be honest — these days, anyone can publish impressive numbers in a datasheet. You’ll often see claims of 6,000 or more cycles with over 80% capacity retention, coming from manufacturers that have barely been around for a year.
That’s exactly why I decided to go with Lishen — and here’s why:
Lishen was incorporated in 1997 and is described as China’s first lithium-ion battery R&D & manufacturing firm.
Officially certified as a “national high-tech firm” with substantial registered capital.
It has a large production capacity (for example, annual capacity noted at ~31 GWh).
Lishen claims a large number of patents (thousands of utility/invention patents).
They have certified labs, such as the UL WTDP lab for the battery industry, and hold ISO/CE/UL/etc certifications.
They are actively involved in standard-setting in China for batteries.
Their product portfolio includes consumer electronics, batteries, vehicle power batteries, and energy storage systems.
On the product side, Lishen promotes long service life, high safety, and full certifications for their cells designed for energy storage/EV use.
Taking all of this into account, I found Lishen to be a trustworthy manufacturer and believe that the specifications in their datasheet are accurate and reliable.
Now something about the cells:
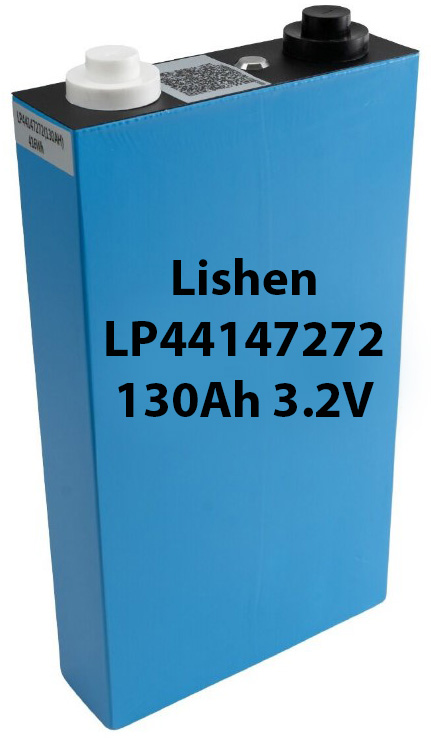
High capacity: The LP44147272 offers 130 Ah at a nominal 3.2 V, meaning each cell stores roughly 416 Wh of energy (3.2 V × 130Ah) as listed in its data sheet.
Low internal resistance: AC impedance is rated at ≤ 1.0 mΩ, which improves efficiency and helps during high discharge/current demand.
Robust cycle life: According to sources, the cell retains ≥80% of capacity after ~2000 cycles under standard conditions (Charging and discharging at 1C).
- Solid build for energy storage / EV / high-demand applications: Many listings show these cells used for electric vehicles, boats, energy storage systems, etc.
- Dimensions: Height – 272, Width – 147.05, Thickness – 44.4 mm, Weight 3425 g, Terminal Type M8
I liked them instantly — the moment I laid eyes on them 🙂
Battery purchase store
I ordered the cells from Nkon.nl and had them delivered to my friend Zoran in Croatia — to whom I owe another big thank-you. Unfortunately, Nkon (as the most decent stores) doesn’t ship directly to this shitty country, so arranging the logistics of getting the batteries first to Croatia and then transporting them to Bosnia turned out to be the biggest challenge of the entire project.
Now let’s deal with BMS
The Daly BMS wouldn’t have been my first choice, but I got a recommendation from a friend who has used some of their BMSes, and the price was very attractive. I ended up with a 100A (charge and discharge) BMS featuring temperature protection and passive balancing for around 20 Euros — definitely worth a try.
As always, I performed my own inspection, and honestly, I’m still not sure whether what I saw is entirely good or bad. With the bottom cover removed, it’s clear that the plastic has a slight deformation from heat. My conclusion? It looks like the BMS was tested at the factory, which is reassuring. On the downside, it could definitely benefit from better cooling.
You can see exactly what I’m talking about, and what I did about it in the pictures below:


")
What to expect from a BMS?
I still need to perform some real-life testing, but for now, everything looks fine. I mean, I want the BMS to take care of my battery — I’m not planning to take it to dinner or chat with it over Bluetooth 🙂.
What I do want it to do is:
Manage charging – prevent overcharging of the whole pack or any single cell.
Manage discharging – prevent over-discharge of any cell.
Monitor temperature – shut down the output if the battery gets too hot.
I haven’t found data on the exact cut-off temperature yet, but I’ll test that as soon as I get some time.
Some Info regarding Battery Box Enclosure Case
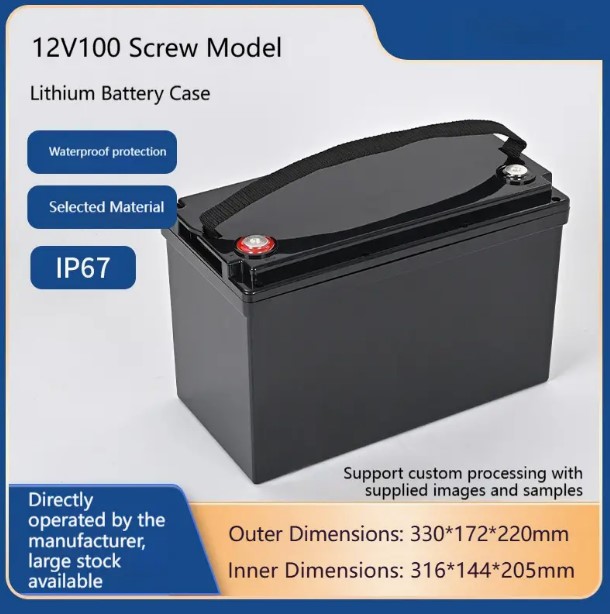
If you take a closer look at the data and the listed inner dimensions of the battery box, you’ll notice that the cells shouldn’t actually fit by width. I spotted this before making the purchase, but something didn’t add up — the outer dimension is specified as 172 mm, while the inner dimension is listed as 144 mm. So where did those 28 mm go?
Fortunately, this turned out to be a lucky error. The cell, which measures 147.05 mm in width, along with two protective sheets, fits perfectly inside the box. I decided to take a calculated risk and, as it turns out, it paid off.
This particular box is marketed for 100 Ah battery packs, yet I managed to fit 130 Ah cells inside. That’s quite an impressive capacity for its size — and quite a bit of weight too, as the finished pack came in at 16.4 kg.
Putting it all together
I’ve put together a gallery that covers nearly every step of the assembly process, with detailed descriptions accompanying each photo.
A quick reminder: when tightening the screws on the battery terminals, apply firm pressure — but no more than 15 Nm.
And most importantly, stay alert while working. It’s surprisingly easy to drop a tool or move a wire in the wrong direction and cause a short circuit. Trust me — you don’t want any fireworks while building your battery pack! 🔧⚡


, and minus intended for output (usually marked with \"P-\" )")


Conclusion
In the end, I managed to build a battery that can easily outperform many prefabricated packs. The best part is that I know exactly what’s inside, how it’s made, and what I can expect from it. Some parts I already had, others I purchased, and in total, the project cost me around 187.5 euros. It took approximately 12 hours to build it completely from scratch.
The next step is to test the BMS and see how it performs under a heavier load — especially to check if it generates any significant heat. So far, I’ve noticed that it cuts off charging at around 13.6 V, which aligns nicely with my expectations and is a good sign. The low-voltage cut-off remains to be tested during discharge.
I also plan to measure and compare the voltage of each cell after both charging and discharging cycles. Based on those results, I’ll decide whether this BMS stays or if it deserves an upgrade. Once enough data is collected, I’ll publish a detailed performance report right here.
Updates:
31. October 2025:
I performed a load test using my pure sine wave inverter and a hairdryer, which showed a 1 kW draw on the display. That corresponds to roughly a 100 A load on the battery. I monitored the system for five minutes, and there were no signs of increased heating on the BMS.
To my surprise, even the 63 A fuse (a slow-blow type) held without tripping. This was only a quick test, but it’s a promising result worth noting.
8. November 2025:
I put the battery through a long discharge test using my inverter, with the load varying between 120 and 600 W for several hours. Eventually, the BMS stepped in and disconnected the load. At the moment of cutoff, the pack voltage measured 10.4 V, which tells me the BMS is doing a solid job.
That corresponds to about 2.6 V per cell—exactly where I want the cutoff to be. I definitely wouldn’t want it to go any lower. As it stands, the BMS is taking excellent care of the battery.
There were no signs of any heating on the case, except in the area above the fuse located beneath the top cover. It’s nothing serious, but the next time I open the box I’ll make sure to check whether the screw terminals are properly tightened. I’ll also measure the voltage of each individual cell to see if there are any imbalances between them.
18. November 2025:
I finally had some time to check the individual voltages of each cell. About 10 days ago, I fully depleted the battery to test and trigger the BMS low-voltage cut-off function. After that, I recharged it for around 10 hours with an 8.5A charging current. I didn’t want to fully charge the pack, since I don’t need maximum capacity right now—or anytime soon—so it’s better to keep it at around 70–80% state of charge. Today, the total battery voltage sits at 13.2V. After opening the box and accessing the individual cell terminals, I measured each one: every cell was at exactly 3.303V. The BMS delivered perfect balance management, and the overall build quality is superb.
The only thing I didn’t check is the temperature at which the BMS triggers a cut-off. I considered heating the NTC sensor externally to see if and when the protection would activate, but I didn’t have the time—or the patience—to run that test right now. Maybe next time. Based on everything I’ve tested so far, I have no reason to doubt that the temperature protection works as intended. In my usage scenario, the cells don’t heat up at all, so there’s really nothing for the BMS to protect them from in that regard anyway.
Everything about this setup confirms it was a smart, worthwhile project—and a truly satisfying build.”
22. November 2025:
I realized I would have a problem with misplacing the terminal screws. The battery case includes plastic terminal covers, which are a great safety feature—when the battery isn’t in use, I don’t want the terminals exposed, because anything falling across them could cause a short circuit. So it’s much safer to keep them covered. The issue? If the screws are tightened into the terminals, the covers can’t be installed. It’s either screws or covers, and I’m pretty sure I would lose those tiny screws in no time. 🙂Then I got an idea. I noticed a couple of unused cavities on the top of the casing—just big enough to store the screws. To keep them from falling out, I glued in a small but very strong neodymium magnet salvaged from an old hard drive. Now the screws are always with the battery, neatly held in place, and I don’t have to worry about losing them again. I really like this little tune-up. 🙂

Thank you for reading — and as always, happy building!

🙂